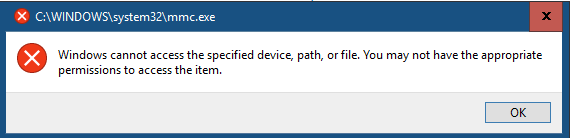
Situation: You may not be able to run GPEDIT by typing mmc in the search bar in of a new Windows such as Windows 10 or Windows Server 2019.
When you click on it, it doesn’t do anything or Or you may get this message: Windows cannot access the specified device, path, or file. You may not have the appropriate permissions to access the item.
Resolution 1: Run gpedit from File Explorer.
•Open the File Explorer.
• Type gpedit.msc
- Press Enter
- Local Group Policy Editor will open.
Resolution 2: Run gpedit.msc from the system32 folder.
•Open the File Explorer
•Navigate to C:\Windows\System32
•Double-click on gpedit.msc
Resolution 3: Run gpedit.msc from Command Prompt
•Type gpedit.msc in the Search Bar
•Right click on Command Prompt
•Click on Run as administrator.
•Type gpedit
•Press Enter
Resolution 4: Run gpedit.msc from PowerShell command
•Type powershell in the Search bar
•Click on Windows PowerShell ISE
•Type gpedit.msc
•Press Enter
Resolution 5: Restore the feature by running power shell command “Enable-WindowsOptionalFeature -Online -FeatureName Microsoft-Hyper-V -All”
•Run PowerShell
•Type this command:
•Enable-WindowsOptionalFeature -Online -FeatureName Microsoft-Hyper-V –All
•Press Enter
* Type Y and press Enter
•That will restore all features.
•You may need to restart the computer.
Please view this step by step video: