After installing Windows 10 update, you may not be able to login your account, or can’t access your profile such as documents, pictures, or some software is missing. This article shows how to fix this issue.
Resolution 1:Try restarting the PC a few times
Resolution 2: Check the profile at C:\Windows.old
Resolution 3. Uninstall Windows update
Resolution 1: Restarting the PC a few times
•Some Windows update may need to restart a few times to complete it or some hardware and software issues.
•If you can’t login or the update shows waiting… forever, power off the computer a couple times.
Resolution 2: Check the profile at C:\Windows.old
* If you can login, but don’t have your profile, check it at C:\Windows.old\users to see if files were archived there.
Resolution 3. Uninstall Windows update
You may have two options to uninstall Windows 10 Update.
1.Uninstall Windows 10 update using GUI
•Click on Start, and then Settings.
* Click on Update & Security
•Click on View Update history.
•You have an option to Uninstall updates
•Follow the wizard to uninstall to previous version.
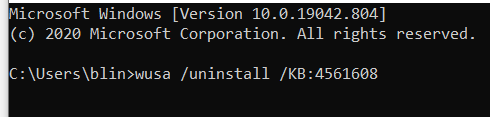
2. Uninstall Windows Update by using command prompt. Here is the example to uninstall KB:4561608.
* Type cmd in the Search box.
* Right click on Command prompt and run as administrator.
* A black command screen will open.
* Type the following command after replacing the KB ID with the one that you wish to uninstall: wusa /uninstall /kb:[id]
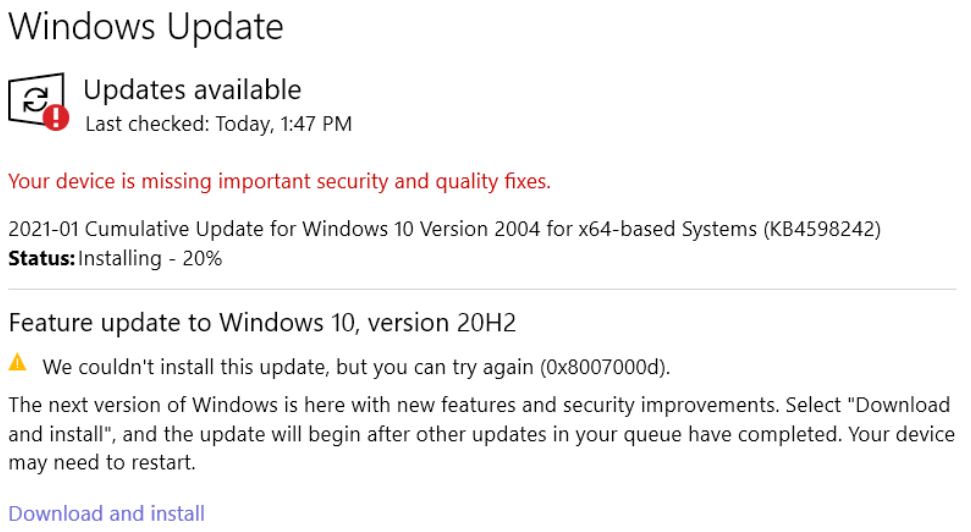
Typical causes of 0x80004005 error include software bugs, incompatible drivers, faulty memory, faulty hardware, corrupt system files and Windows update crashed. This article shows all our case collections with resolutions.
Resolution 1: Install latest Windows 10 version
Resolution 2: Download the specific update from Microsoft Update Catalog
Resolution 3: Repair hard drive errors
Resolution 4: We fix this problem by installing latest hardware driver.
Resolution 5: Run Computer BISO Diagnostic Tool
Resolution 6: Run SFC/Scannow
Resolution 7: Resetting Operating System
Resolution 1: Install latest Windows 10 version
* As we know Windows 10 2004 Version fixes many 20H2 version issue. We recommend installing 2004 version instead of 20H2 version.
* The Update Assistant can help you update to the latest version of Windows 10
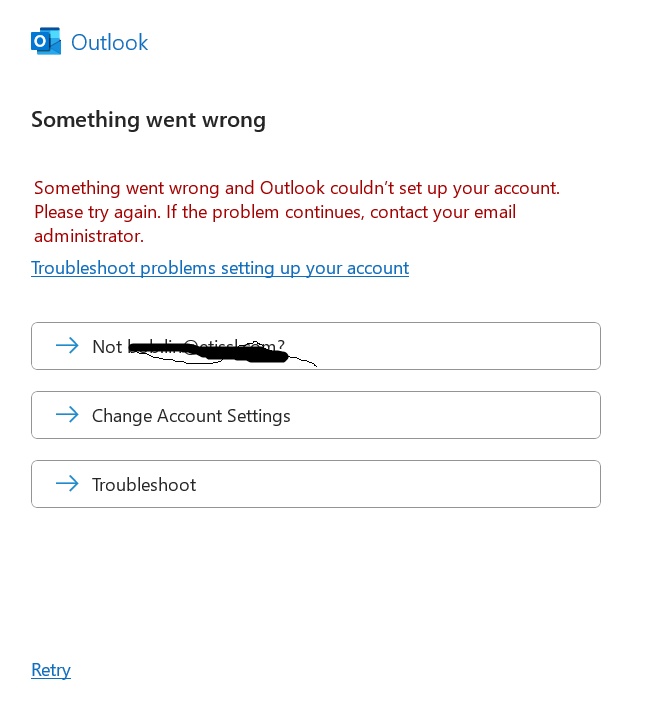
When opening yahoo email on Outlook, you may receive this message: Synchronizing subscribed folders for yahoo email reported error: (0x800CCC0E): “Outlook cannot synchronize subscribed folders.
This video shows resolutions for this issue.
Resolution 1: Repair the yahoo email account.
Resolution 2:Re-add the yahoo email account
Resolution 3: Generate password for login Yahoo email
Resolution 1: Repair the yahoo email account.
•With Outlook open, click File.
* Click Account Settings>Account Settings.
•Highlight the yahoo email
•Click on Repair.
Resolution 2: Re-add the yahoo email account
•If the repair doesn’t fix the problem, you may want to remove and re-add yahoo email on Outlook.
•In Outlook Email account page, click Remove.
•To re-add the yahoo email, click on New
•Follow the wizard to add yahoo email.
Resolution 3: Generate password for login Yahoo email
When setup the yahoo email or re-add the yahoo email to Outlook because of a problem, you may receive this message: Something went wrong. To fix this problem you need to generate a password on Yahoo app. This article shows how to do so.
1.Open Yahoo app oh your phone.
2.Tap the settings icon
3. Tap Manage account
4. Tap Account Info
5. Tap Security Settings.
6. Tap Manage app password.
7. It should generate 16 letters Password looks like
qrey outp iytu rtye
8. Now, go back to Outlook to enter this password instead of your regular password.
You have added yahoo email on Outlook successfully
Also, it could be the license. Make sure you have assigned license to the account.
software/frameworks, Windows update, old or bad drivers, conflicting applications etc. This article offers some resolutions.
Resolution 1: Re-add or re-scan the Bluetooth
Resolution 2: Turn on the Bluetooth
Resolution 3: Enable Bluetooth Support Service
Resolution 4: Update Bluetooth Driver Windows 10
Resolution 5: Run the Bluetooth Troubleshooter
Resolution 6: Check or Upgrade BIOS
Resolution 7: Download the driver from manufactory website
Resolution 8: Install windows latest update
Resolution 1: Re-add or re-scan the Bluetooth.
1. Use Device Manager to scan the hardware device.
•Type device manager in the Search bar.
•Click on Device Manager to open it.
* In Device manager, click Scan for hardware change that add any missing Bluetooth.
2. Use Setup
* Go to Settings
* Click on Devices
* Click Add Bluetooth or other device
* Click on Bluetooth to add any missing Bluetooth devices.
Resolution 2: Turn on the Bluetooth
* Go to Settings
* Click on Devices
* For example, on your phone, make sure the Bluetooth is on.
* On some laptops, there is a separate key present for enabling/disabling the Bluetooth device. Make sure that the Bluetooth is enabled using that physical key on your laptop.
Resolution 3: Enable Bluetooth Support Service
By default, the Bluetooth service startup type is set as Manual instead of Automatic. We can change it to Automatic that may fix the Bluetooth disappearing problem.
•Type services in the Search bar.
•Click on Services to open it.
* Change the Startup to Automatic or just start it for a test.
Resolution 4: Update Bluetooth Driver Windows 10
* Open Device Manager
•Right click on the Bluetooth device you want to update, for example Headset Earphone.
•Click on Update driver.
Resolution 5: Run the Bluetooth Troubleshooter
•Type troubleshooting in the Search bar.
•Click Open.
•Click on Bluetooth
Resolution 6: Check or Upgrade BIOS
•Access BISO to check Bluetooth status. Download the BISO from the manufactory website.
To access BISO for most Dell computers, press F12 when booting.
For most HP Computer, press F2 repeatedly.
Resolution 7: Download the driver from manufactory website
Resolution 8: Install windows latest update
* Go to Settings>Update & Security to download and install the Windows update or version.
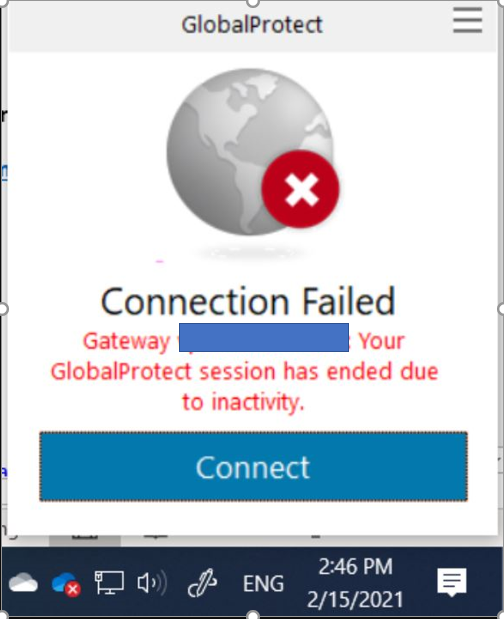
If you don’t use GlobalProtect VPN for a while, you may see this message: Connection Failed. This is normal and click Connect to re-establish the VPN. If it doesn’t, please try the following steps.
Step 1: Restart the Globlaprotect Service (PanGPS)
•Type services in the Search bar.
•Click on Services to open it.
•Find and highlight the PanGPS
•Click restart icon to restart the PanGPS service.
•Then try to connect the GlobalProtect.
Step 2: Restart the computer.
Step 3: Re-install the GlobalProect.
* Please follow another video to re-install the GloablProtect.
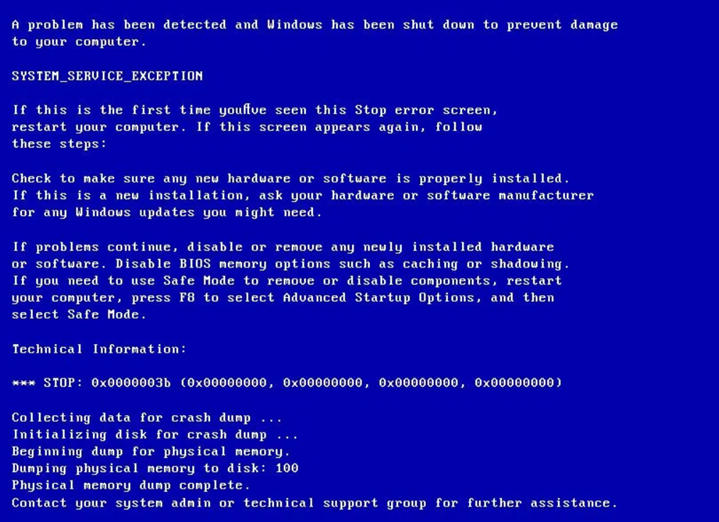
Typical causes of blue screen include software bugs, incompatible drivers, faulty memory, faulty hardware, corrupt system files and Windows update crashed. This article shows all our case collections with resolutions.
Resolution 1: Repair hard drive errors
Resolution 2: We fix this problem by installing latest hardware driver.
Resolution 3: Run Computer BISO Diagnostic Tool
Resolution 4: Run SFC/Scannow
Resolution 5: Resetting Operating System
Resolution 6: Run Windows Memory Diagnostic Tool
Resolution 7: You can try Safe mode by following these steps if resolution 3 doesn’t fix the problem
Resolution 1: Repair hard drive errors
1.In the Search box on the taskbar, type command prompt, and then select Run as administrator from the list of options.
2.Select Yes.
3.In the window that appears, type the following command, including the space as shown: chkdsk /f C: and then press Enter.
4.Enter Y and press Enter
5.Repairs will automatically start on your hard drive, and you’ll be asked to restart your device.
6.After restart, try the update installation.
Resolution 2: We fix this problem by installing latest hardware driver.
1. In the Search bar, type Device Manager.
2. Open Device Manager.
3. Expand the suspected device that causes the problem, Firmware in our example.
4. Right-click the device and select Update Driver Software.
5. You may need to restart the computer, and then try the update again.
Resolution 3: Run Computer BISO Diagnostic Tool
For most Dell computers, press F12 when booting.
For most HP Computer, press F2 repeatedly
For most Lenovo Computer, press F10 to run Lenovo Diagnostics Tool.
Resolution 4: Run SFC/Scannow
1. In the search box on the taskbar, type command prompt, then select Run as administrator from the list of options.
2. In the window that appears, type this command including spaces as shown:
sfc /scannow
3. Press Enter. Wait until the sfc scan verification reaches 100% completion, and then close Command Prompt.
Resolution 5: Resetting Operating System
Type in “RESET PC” in the Search bar.
Click on Open.
* Click on Get started to reset the PC.
Note: You may have another option to Go back to the previous version of Windows 10 if the PC was updated in 10 days.
Resolution 6: Run Windows Memory Diagnostic Tool
1. Click on Start Menu and type Memory Diagnostic.
2. Click on Select Windows Memory Diagnostics.
3. Click on Restart now and check for problems.
Note: It will restart your computer. So save and close apps.
4. Follow the on-screen instructions. It may take half hour to check any problems.
Note: you can also use manufactory memory diagnostic tool to check any errors.
Resolution 6: We fixed the blue screen error by performing a clean restart into Windows
A clean restart starts Windows with a minimal set of drivers and startup programs.
1) Run MSCONFIG.EXE.
2) In the Services tab, click “Hide All Microsoft Services” and click
“Disable All”.
3) In the Startup tab, click “Disable All”. Click OK. (This will
temporarily prevent third-party programs from running automatically during
start-up.)
4) Restart, and then try the update installation
Resolution 7: You can try Safe mode by following these steps if resolution 3 doesn’t fix the problem.
1. Hold down the power button for 10 seconds to turn off your device.
2. Press the power button again to turn on your device.
3. On the first sign that Windows has started, for example, Dell’s logo hold down the power button for 10 seconds to turn off your device.
4. Press the power button again to turn on your device.
5. When Windows restarts, hold down the power button for 10 seconds to turn off your device.
6. Press the power button again to turn on your device.
7. Allow your device to fully restart to enter WinRE.
8. On the Choose an option screen, select Troubleshoot.
9. Select Advanced options.
10. Select Setup Settings.
11. Select Restart.
12. After your device restarts, you’ll see a list of options. Select 5 for Safe Mode with Networking.
13. Open Control Panel.
14. Select Uninstall a program under Programs. If you’re using Large/Small icons View, Select Uninstall a program under Programs and Features.
15. On the left-hand side, select View installed updates.
16. Right-click the update you want to uninstall, or the latest update.
17. Click Uninstall.
18. Select Yes to confirm and then Restart Now after the update uninstalled.
19. Try to re-install the Windows updater after the restart.
Notes: If you need to exit safe mode, here’s how:
1. In the Search box, type msconfig, and then select OK.
2. Select the Boot tab.
3. Under Boot options, clear the Safe boot check box.
After using your company email to join a domain, you may not be able to login local domain computer or have a problem to map LAN drives with “Your credentials did not work”. The problem is the computer was joining the Microsoft Azure AD instead of local domain. To fix this problem, add a local account first on your PC and then re-join the domain. Here is how.
1.Type netplwiz, in the Search bar.
2.Click on Open.
3. Click Add.
4. Type your admin username and password.
5. Check Administrator
6. Click on Finish to complete the settings.
7. Sign off the current Microsoft account and re-sign in with the new created local admin account. 8.Re-join the domain
* Go to Settings>System>About>Advanced System Settings.
Recently more and more people receive “Internet Explorer Has Stopped Working” popup in their Windows 10 computer. This article offers some fixings.
Resolution 1: Make sure the default Web Browser is not setup for Internet Explorer.
* Open Settings.
* Click on Apps
* Click on Default apps n the left pane.
* Narrow down until Webbrowser.
* Click on Wen browser
* Select your default web browser except Internet Explorer.
Resolution 2: Disable add-ons.
•With the Internet Explorer open, click on Settings icon.
•Click on Manage add-ons.
* Disable all add-ons and try it again.
Resolution 3: Check Windows update status and install the latest update. •Go to Settings>Update & Security
Resolution 4: Reset Internet Explorer and restart the computer.
The problem might be caused by low memory. Please try these steps:
* Open Internet Explorer and select Settings icon > Internet options.
* Select the Advanced tab, and then select Reset.
* In the Reset Internet Explorer settings dialog box, select Reset.
* Then restart the computer.
1. In the search box on the taskbar, type command prompt, then select Run as administrator from the list of options.
2. In the window that appears, type this command including spaces as shown:
DISM.exe /Online /Cleanup-image /Restorehealth
3. Press Enter. When the command operation has run successfully, you’ll see a confirmation message from Command Prompt that says, “The restore operation completed successfully” or “The operation completed successfully”.
Note: If you don’t see a confirmation message, retype the command and try again.
4. Restart, and then try the update installation
Resolution 5: Repair system files
1. In the search box on the taskbar, type command prompt, then select Run as administrator from the list of options.
2. In the window that appears, type this command including spaces as shown:
DISM.exe /Online /Cleanup-image /Restorehealth
3. Press Enter. When the command operation has run successfully, you’ll see a confirmation message from Command Prompt that says, “The restore operation completed successfully” or “The operation completed successfully”.
Note: If you don’t see a confirmation message, retype the command and try again.