Outlook: Changes to the public group membership cannot be saved

Situation: A user has been assigned as a Distribution group manager to manage the email group. However, he gets this message when he tries to add a member: Changes to the public group membership cannot be saved. You do not have sufficient permissions to perform this operation on this object.

Troubleshooting:

When we checked the status of owners, it shows the user is the owner.

Finally, we find the problem is the user doesn’t have permissions to add the membership.

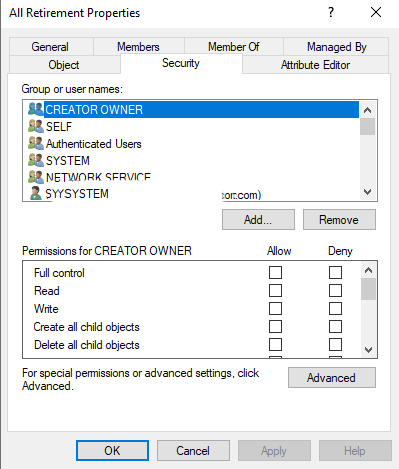
Giving Full control fixes the problem.

However, as Microsoft article “Owners of an on-premises distribution group synced to O365 can’t manage the distribution group in Exchange Online” mentioned: When an on-premises distribution group is synced to a Microsoft 365 organization through Active Directory synchronization, migrated users who are owners of the distribution group can’t manage it in Microsoft Exchange Online.

Also quoted from Office 365 – Allowing Users to Edit Exchange Groups They Manage – Perficient Blogs

Exchange Hybrid and Directory Synchronization provide for the most full-featured integration experience with your on-premises messaging environment. Users, for the most part, are unaware of whether their mailbox is in the cloud or on-premises.

There are, however, a few limitations with Exchange Hybrid and Directory Synchronization.

One of these limitations is around distribution groups that have had managers assigned for administrative purposes. If you have users that manage their own distribution groups via Outlook, you’ll find that this functionality does not work once the group manager has been moved to Exchange Online. This limitation should hopefully not come as a surprise, it’s a topic I discuss with my clients during every Exchange Online engagement. It is also an issue where unfortunately there are not a lot of great options for resolution.

Can’t access remote office over Paloalto firewall site to site VPN

Situation: The client has a site to site VPN to connect head office and remote office. Current computers which IP addresses have been added to firewall work fine. However, when they add more IP addresses in inbound policy on the remote office, the new IP doesn’t work.

Troubleshooting: We do see those IP addresses in remote office PA firewall. Note: Go to POLICY>Security, check the IPSec inbound policy.

In the Head Office PA firewall, we check the Monitor and find those IP addresses accessing to Remote Office port 3389 was denied.

Checking Head Office PA firewall IPSec outbound policy, we don’t see those IP addresses in.

Adding those IP addresses into Head Office PA firewall IPSec outbound policy fixes the problem.


Can’t login with this message: Failed to connect to the Veeam Backup & Replication server

Situation: When attempting to login Veeam backup & Replication, yo umay receive this error: Failed to connect to the Veeam Backup & Replication server:
No connection could be made because the target machine actively refused it <IP>:9392


Troubleshooting: The Veeam Backup Service has not started yet. Starting the services fixes the problem. 

Veeam Error: The RPC server is unavailable. RPC function call failed

Situation: The client receives this Error: The RPC server is unavailable. RPC function call failed. Function name: [InvokerTestConnection] from their Veeam Backup. Target machine: Host05.

Troubleshooting 1: Veeam Backup & Replication may not be able to reach the Veeam Installer Service on the remote machine.

To fix this issue, please follow steps:

  1. Make sure the Veeam Installer Service is running on the machine specified in the error, Host05 in our case.
  2. If the Veeam Installer Service cannot be started, check if another application is using the default port (6160) used by the Veeam Installer Service.Use the following command to list the PID of the application using port 6160:
    Get-Process -Id (Get-NetTCPConnection -LocalPort 6160).OwningProcess
    

    Alternatively, check within the Listening Ports section of the Network tab in Resource Monitor:

    1. If the Veeam Installer Service is running on the remote machine, run the following PowerShell command on the Veeam Backup & Replication server to isolate the connection issue:
      Replace <remote_machine> with the hostname, FQDN, or IP shown in the error.
    Test-NetConnection -ComputerName "<remote_machine>" -Port 6160
    1. If neither PowerShell nor Veeam Backup & Replication  can reach the port and the Veeam Installer Service is running on the remote machine, investigate whether a firewall is blocking connectivity between the two machines.

    Other possible resolutions:

    • The Netlogon service is not running and is disabled.
    • Antivirus on the remote machine is preventing the VeeamDeploymentSvc.exe from being run.
      Process location: C:\Windows\Veeam\Backup
    • The Veeam Installer Service is not installed. In such a situation, edit the machine’s entry within the Backup Infrastructure > Managed Servers section and next the pages of the Edit Windows Server wizard to force the package to be redeployed.
    • The Veeam Installer Service package was partially updated. In such a situation, uninstall the Veeam Installer Service from the remote machine. Then edit the machine’s entry within the Backup Infrastructure > Managed Servers section and next through the pages of the Edit Windows Server wizard to force the package to be redeployed.

Device is pending in TP-Link Wireless Controller

Situation: The client purchased two TP-link wireless APs and tries to configure them as Wireless Controller. He can see the Wireless APs but they are pending.

Troubleshooting: By design, TP-Link controller uses default username and password admin to add each AP. If you have changed the default admin password, it will show pending. You need to click on Pending to abode it, which will popup for the admin password you changed. If you don’t enter correct password or don’t remember the password, you need to reset the Wireless AP.


What’s the problem of This field should be visible ASCII

Situation: When the client sets up his password, he gets this message: This field should be visible ASCII.

Troubleshooting: Quoted: “ASCII, in full American Standard Code for Information Interchange, a standard data-encoding format for electronic communication between computers. ASCII assigns standard numeric values to letters, numerals, punctuation marks, and other characters used in computers”.

Some symbols may not allow to use as password. In our example, it can’t take space.


Fixing QNAP: “Failed to upload disk analysis data”

Situation: The client has QNAP storage and receives this message: Message: [Storage & Snapshots] Failed to upload disk analysis data. Disk: Host: Disk 2. The network quality is poor. The system will retry uploading the data once per day. After 7 failed attempts the data will be automatically deleted.

Troubleshooting: This is just a warning and will not affect the data on the drive. You may wat to disable it if the message persists.

  1. Go to NAS Storage & Snapshots.

2. Click on Global Settings icon located on the top right of the window.

3. Click on Disk / Device.

4.  Disable “Share my disk analysis data with QNAP” and click “Apply”.


Cisco boot looping: Failed to launch boot task binos_script.service

Situation: After upgrading Cisco C9200 switch from 17.06.03 to 17.06.04, the switch has a loop booting with this message: Failed to launch boot task binos_script.service


Cause: We checked the issue, and we observed that switch had packages’ files in flash. In this case, customer performed the IOS upgrade in Install mode but something happens during the process. Fortunately, in the flash was .bin file of the new version. In other words, current operation mode is install and should use package file instead of .BIN file. If you prefer to use boot from .BIN file, convert install mode to Bundle mode. Please refer to this post:

Troubleshooting: We reset the switch. Please refer to this post:

Convert the mode to bundle mode and boot from .BIN file. Here is how.

switch:dir flash:


switch:set boot flash:cat9k_lite_iosxe.17.06.04.SPA.bin

set boot flash: meaning set up the variable boot on Bundle mode

switch:boot flash:cat9k_lite_iosxe.17.06.04.SPA.bin

This will reboot and load cat9k_lite_iosxe.17.06.04.SPA.bin and press RETURN to get started

After this procedure, device came up normally. Enable and check the software version.

The IOS upgrade to the 17.06.04 was successful. Switch Ports Model SW Version SW Image Mode
—— —– —– ———- ———- —-
* 1 56 C9200-48P 17.06.04 CAT9K_LITE_IOSXE BUNDLE


Please view this step by step video:


Cisco loop booting: Failed to load driver dp lr_oobnd

Situation: After upgrading Cisco C9200 switch from 17.06.03 to 17.06.04, the switch has a loop booting with this message:  Failed to load driver dp lr_oobnd ( modprobe: FATAL: Module dplr_oobnd not found in directory /lib/module s/4.19.237 (rc 1) ).

Cause: We checked the issue, and we observed that switch had packages’ files in flash. In this case, customer performed the IOS upgrade in Install mode but something happens during the process. Fortunately, in the flash was .bin file of the new version. In other words, current operation mode is install and should use package file instead of .BIN file. If you prefer to use boot from .BIN file, convert install mode to Bundle mode. Please refer to this post:

Troubleshooting: We reset the switch. Please refer to this post:

Convert the mode to bundle mode and boot from .BIN file. Here is how.

switch:dir flash:


switch:set boot flash:cat9k_lite_iosxe.17.06.04.SPA.bin

set boot flash: meaning set up the variable boot on Bundle mode

switch:boot flash:cat9k_lite_iosxe.17.06.04.SPA.bin

This will reboot and load cat9k_lite_iosxe.17.06.04.SPA.bin and press RETURN to get started

After this procedure, device came up normally. Enaale and check the software version.

The IOS upgrade to the 17.06.04 was successful. Switch Ports Model SW Version SW Image Mode
—— —– —– ———- ———- —-
* 1 56 C9200-48P 17.06.04 CAT9K_LITE_IOSXE BUNDLE