Problem to establish FTP connection

2. If you see 530 Login authentication failed lik ethis one:

Command: PASS ************
Response: 530 Login authentication failed
Error: Critical error: Could not connect to server

Make sure you have entered correct host name and password.

2. If you receive timeout message:

Error: Connection timed out after 20 seconds of inactivity
Error: Failed to retrieve directory listing

Make sure you enter the correct host name, port number, Encryption settings, username and password.

3. Also make sure your firewall doesn’t block the FTP traffic.

Please refer to this link for how to configure FTP client: How to configure FTP client

How to configure Filezalla FTP client

In this example, we will show you how to configure Filezilla FTP client connecting to your FTP server on bluehost.

1. Download and install Filezilla.
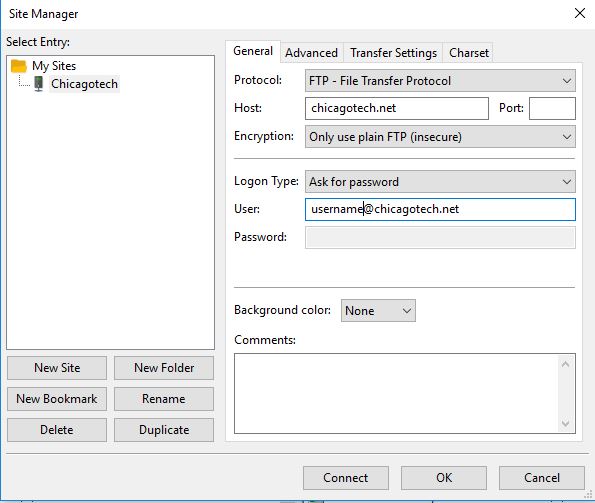
2. After running Filezilla, open Site Manager from file.
3. Enter you FTP server, for example Chicagotech.net, port 21, Only use plain FTP (insecure) in Encryption line (note: plain FTP is bluehost uses now), Ask for password in Logon Type, username@yourdomainname.
4. Click Connect. That will popup for the password.

5. If everything setup correctly, you will see “Directory listing of “/public_html” successful and “Connected established”.

How to make domain from federated to standard

Situation: A small company decide to remove their ADFS service from the domain because they use Office 365 only and Office 365 provides password hashes that handles the user authentication.

Resolution: To disable ADFS service or make the domain from Federated to standard, please run these powershell commands:
Connect-MsolService
Get-MsolDomain
Convert-MsolDomainToStandard -DomainName

Here DomainName is your company domain. For Chicagotech.net the command will be
Convert-MsolDomainToStandard -Chicagotech.net

ADFS server issue

Our ADFS server (In LAN) and ADFS Proxy server (in Azure) have a problem. The Outlook and phone keep popup for credentials. We open a case wit Office 365 team. This is what they email to me: “we found the public IP address belongs to azure machine and requests were getting dropped while forwarding to on premise environment. As we are not trained on Azure networking part so we suggested you to open a ticket with azure team. Please update us in case of our assistance/collaboration required while working with azure team”.

Relius Web Site down

Situation: the client has a Website down issue.

Troubleshooting:
I don’t see many related events in the Event Viewer. However, I do see 6 Windows updates waiting for installing. We will schedule to install them.

To fix the problem, first of all, login the Relius web server using administrator credentials. Go to Services and restart IIS Admin Service and World Web Publishing Service.

If above doesn’t fix the problem, restart the Relius web server. It is better to restart it onsite because the site may hang and need press Enter key in console.

Routing on SonicWall doesn’t work

Situation: the client created VLANs in their network and configured routing on SonicWall, but the routing doesn’t work and VoIP VLAN can’t access the Internet and data VLAN can’t access the VoIP VLAN.

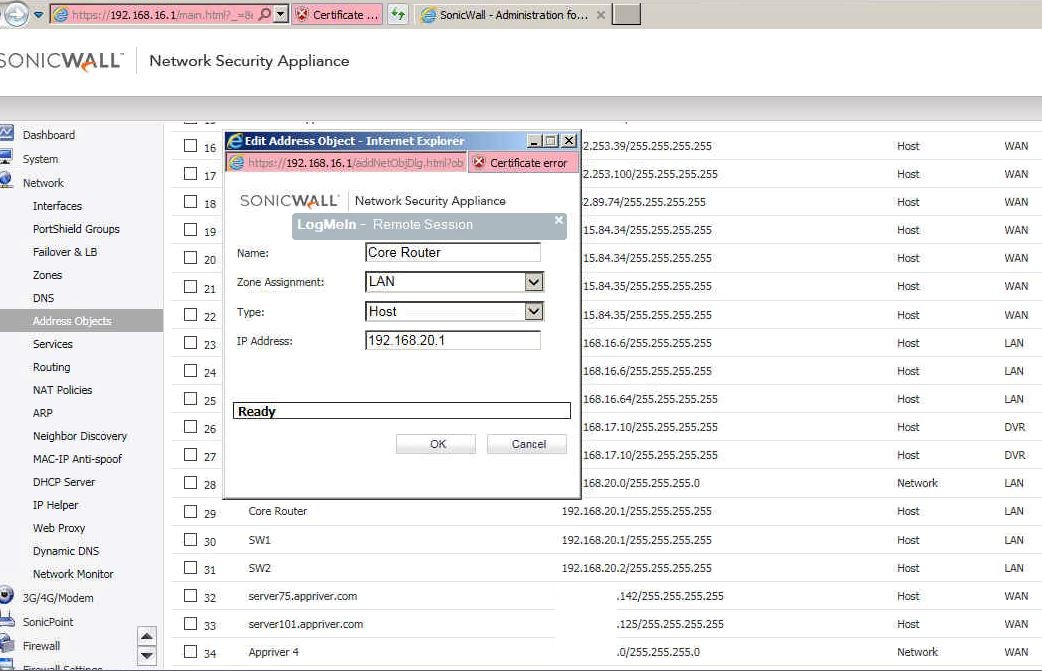
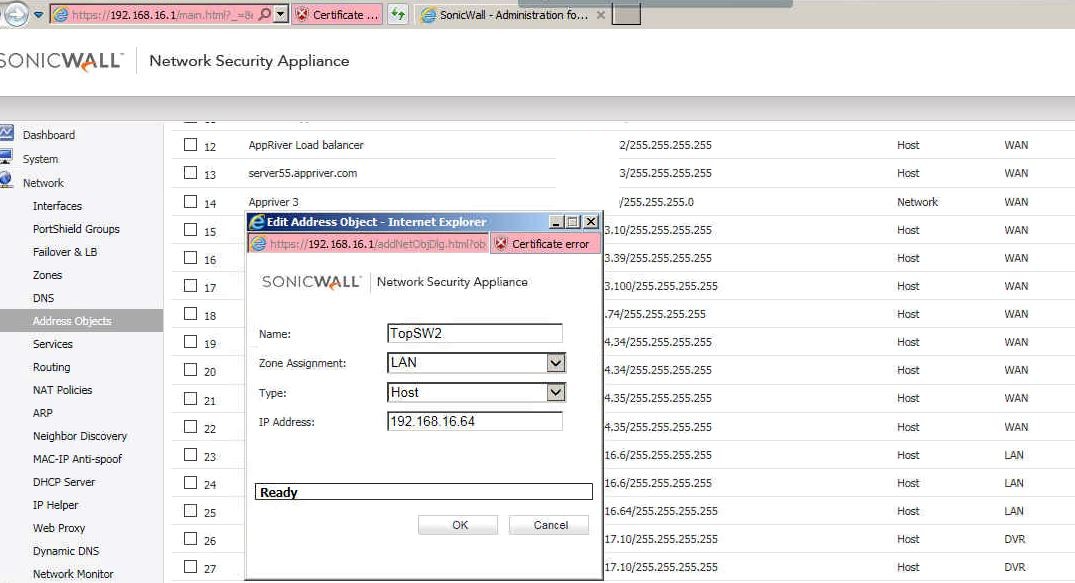
Troubleshooting: The gateway they tried to add for the routing policy is using VLAN VoIP Ip address (192.169.20.1) on the switch instead of data VLAN IP address (192.168.16.64).


Since the default gateway is in the data VLAN (192.168.16.1), we create a new network object using switch data IP address (192.168.16.64) and replace the IP address 192.168.20.1. That fixes the problem

More details can be found this link: How to configure routing on SonicWall

VPN Client access second office in site to site VPN

The client has a site to site VPN connecting two offices. When owner uses VPN client establishing connection to one of office (OfficeA), he can’t RDP to the servers in second office (OfficeB). I assume we need to add NAT and access list, but don’t know how to do it. I know little about ASDM. Attached is the configuration file. Any help will be appreciated. This is configuration
name 172.31.31.0 inside-voice
name 10.100.1.0 anyconnect-network description anyconnect dhcp pool network
name 192.168.1.2 CallManager description Call Manager Express
ip local pool IPSEC_DHCP 192.168.200.100-192.168.200.200 mask 255.255.255.0
ip local pool anyconnect_pool 10.100.1.1-10.100.1.25 mask 255.255.255.0
access-list inside_access_in extended permit ip any4 any4
access-list inside_access_in extended permit icmp any4 any4
access-list inside_nat0_outbound extended permit ip 192.168.0.0 255.255.0.0 192.168.0.0 255.255.0.0
access-list inside_nat0_outbound extended permit ip 172.31.0.0 255.255.0.0 192.168.0.0 255.255.0.0
access-list inside_nat0_outbound extended permit ip 10.254.254.0 255.255.255.0 192.168.0.0 255.255.0.0
access-list inside_nat0_outbound extended permit ip 192.168.0.0 255.255.0.0 172.34.0.0 255.255.0.0
access-list inside_nat0_outbound extended permit ip 172.31.0.0 255.255.0.0 172.34.0.0 255.255.0.0
access-list inside_nat0_outbound extended permit ip 10.254.254.0 255.255.255.0 172.34.0.0 255.255.0.0
access-list inside_nat0_outbound extended permit ip 192.168.1.0 255.255.255.0 object anyconnect-network
access-list remote_VPN extended permit ip 192.168.0.0 255.255.0.0 any4
access-list remote_VPN extended permit ip 172.31.0.0 255.255.0.0 any4
access-list remote_VPN extended permit ip 10.254.254.0 255.255.255.0 any4
access-list split-tunnel standard permit 192.168.1.0 255.255.255.0
access-list outside_access_in extended permit icmp any4 any4
access-list outside_access_in extended permit ip any4 host x.x.2.138
access-list outside_access_in extended permit icmp any4 host x.x.2.138
access-list outside_access_in extended permit ip host x.x.193.56 any4
access-list outside_access_in extended permit object-group DM_INLINE_PROTOCOL_1 object-group momentum_networks object CallManager
access-list outside_cryptomap_1 extended permit ip 192.168.1.0 255.255.255.0 192.168.0.0 255.255.255.0
icmp unreachable rate-limit 1 burst-size 1
icmp permit any outside
icmp permit any inside
asdm image disk0:/asdm-761.bin
no asdm history enable
arp timeout 14400
no arp permit-nonconnected
nat (inside,any) source static obj-172.31.0.0 obj-172.31.0.0 destination static obj-192.168.0.0 obj-192.168.0.0 no-proxy-arp route-lookup
nat (inside,any) source static obj-10.254.254.0 obj-10.254.254.0 destination static obj-192.168.0.0 obj-192.168.0.0 no-proxy-arp route-lookup
nat (inside,any) source static obj-172.31.0.0 obj-172.31.0.0 destination static obj-172.34.0.0 obj-172.34.0.0 no-proxy-arp route-lookup
nat (inside,any) source static obj-10.254.254.0 obj-10.254.254.0 destination static obj-172.34.0.0 obj-172.34.0.0 no-proxy-arp route-lookup
nat (inside,any) source static obj-192.168.1.0 obj-192.168.1.0 destination static anyconnect-network anyconnect-network no-proxy-arp route-lookup
nat (inside,4G-LTE) source static CallManager interface service CME1 CME1
nat (inside,outside) source static CallManager interface service CME1 CME1
nat (inside,outside) source static NETWORK_OBJ_192.168.1.0_24 NETWORK_OBJ_192.168.1.0_24 destination static NETWORK_OBJ_192.168.0.0_24 NETWORK_OBJ_192.168.0.0_24 no-proxy-arp route-lookup
!
object network obj_any
nat (inside,outside) dynamic interface
access-group outside_access_in in interface outside
route outside 0.0.0.0 0.0.0.0 x.x.2.142 1 track 1
route 4G-LTE 0.0.0.0 0.0.0.0 192.168.101.1 254
route inside 10.254.254.0 255.255.255.0 CallManager 1
route inside inside-voice 255.255.255.0 CallManager 1
crypto ipsec ikev1 transform-set ESP-AES-256-SHA esp-aes-256 esp-sha-hmac
crypto ipsec ikev1 transform-set ESP-3DES-SHA esp-3des esp-sha-hmac
crypto ipsec ikev1 transform-set ESP-DES-MD5 esp-des esp-md5-hmac
crypto ipsec ikev1 transform-set ESP-AES-128-SHA esp-aes esp-sha-hmac
crypto ipsec ikev1 transform-set ESP-AES-128-MD5 esp-aes esp-md5-hmac
crypto ipsec ikev1 transform-set ESP-AES-192-SHA esp-aes-192 esp-sha-hmac
crypto ipsec ikev1 transform-set ESP-AES-192-MD5 esp-aes-192 esp-md5-hmac
crypto ipsec ikev1 transform-set ESP-AES-256-MD5 esp-aes-256 esp-md5-hmac
crypto ipsec ikev1 transform-set ESP-AES-128-SHA-TRANS esp-aes esp-sha-hmac
crypto ipsec ikev1 transform-set ESP-AES-128-SHA-TRANS mode transport
crypto ipsec ikev1 transform-set ESP-AES-128-MD5-TRANS esp-aes esp-md5-hmac
crypto ipsec ikev1 transform-set ESP-AES-128-MD5-TRANS mode transport
crypto ipsec ikev1 transform-set ESP-AES-192-SHA-TRANS esp-aes-192 esp-sha-hmac
crypto ipsec ikev1 transform-set ESP-AES-192-SHA-TRANS mode transport
crypto ipsec ikev1 transform-set ESP-AES-192-MD5-TRANS esp-aes-192 esp-md5-hmac
crypto ipsec ikev1 transform-set ESP-AES-192-MD5-TRANS mode transport
crypto ipsec ikev1 transform-set ESP-AES-256-SHA-TRANS esp-aes-256 esp-sha-hmac
crypto ipsec ikev1 transform-set ESP-AES-256-SHA-TRANS mode transport
crypto ipsec ikev1 transform-set ESP-AES-256-MD5-TRANS esp-aes-256 esp-md5-hmac
crypto ipsec ikev1 transform-set ESP-AES-256-MD5-TRANS mode transport
crypto ipsec ikev1 transform-set ESP-3DES-MD5 esp-3des esp-md5-hmac
crypto ipsec ikev1 transform-set ESP-3DES-SHA-TRANS esp-3des esp-sha-hmac
crypto ipsec ikev1 transform-set ESP-3DES-SHA-TRANS mode transport
crypto ipsec ikev1 transform-set ESP-3DES-MD5-TRANS esp-3des esp-md5-hmac
crypto ipsec ikev1 transform-set ESP-3DES-MD5-TRANS mode transport
crypto ipsec ikev1 transform-set ESP-DES-SHA esp-des esp-sha-hmac
crypto ipsec ikev1 transform-set ESP-DES-SHA-TRANS esp-des esp-sha-hmac
crypto ipsec ikev1 transform-set ESP-DES-SHA-TRANS mode transport
crypto ipsec ikev1 transform-set ESP-DES-MD5-TRANS esp-des esp-md5-hmac
crypto ipsec ikev1 transform-set ESP-DES-MD5-TRANS mode transport
crypto ipsec ikev2 ipsec-proposal DES
protocol esp encryption des
protocol esp integrity sha-1 md5
crypto ipsec ikev2 ipsec-proposal 3DES
protocol esp encryption 3des
protocol esp integrity sha-1 md5
crypto ipsec ikev2 ipsec-proposal AES
protocol esp encryption aes
protocol esp integrity sha-1 md5
crypto ipsec ikev2 ipsec-proposal AES192
protocol esp encryption aes-192
protocol esp integrity sha-1 md5
crypto ipsec ikev2 ipsec-proposal AES256
protocol esp encryption aes-256
protocol esp integrity sha-1 md5
crypto ipsec security-association pmtu-aging infinite
crypto dynamic-map outside_dyn_map 20 set ikev1 transform-set ESP-3DES-SHA ESP-AES-256-SHA
crypto dynamic-map outside_dyn_map 20 set security-association lifetime seconds 28800
crypto dynamic-map outside_dyn_map 20 set security-association lifetime kilobytes 4608000
crypto map outside_map 1 match address outside_cryptomap_1
crypto map outside_map 1 set peer x.x.76.27
crypto map outside_map 1 set ikev1 transform-set ESP-AES-128-SHA ESP-AES-128-MD5 ESP-AES-192-SHA ESP-AES-192-MD5 ESP-AES-256-SHA ESP-AES-256-MD5 ESP-3DES-SHA ESP-3DES-MD5 ESP-DES-SHA ESP-DES-MD5
crypto map outside_map 1 set ikev2 ipsec-proposal DES 3DES AES AES192 AES256
crypto map outside_map 65535 ipsec-isakmp dynamic outside_dyn_map
crypto map outside_map interface outside
crypto ca trustpoint localtrust
enrollment self
crl configure
crypto ca trustpoint ASDM_TrustPoint1
enrollment terminal
crl configure
crypto ca trustpoint ASDM_TrustPoint2
enrollment terminal
crl configure
crypto ca trustpoint ASDM_TrustPoint3
enrollment terminal
crl configure
crypto ca trustpoint ASDM_TrustPoint4
enrollment terminal
crl configure
crypto ca trustpoint ASDM_TrustPoint5
enrollment terminal
crl configure
crypto ca trustpoint ASDM_TrustPoint6
enrollment terminal
crl configure
crypto ca trustpoint ASDM_TrustPoint7
enrollment terminal
crl configure
crypto ca trustpoint ASDM_TrustPoint0
enrollment terminal
fqdn bobvpn.chicagotech.com
subject-name CN=bobvpn.ms-mvps.com,O=”chicagotech”,C=US,St=IL
keypair bobanyconnect
crl configure
crypto ca trustpoint ASDM_TrustPoint8
crl configure
crypto ca trustpoint ASDM_TrustPoint9
enrollment terminal
crl configure
crypto ca trustpoint ASDM_TrustPoint10
crl configure
crypto ca trustpoint ASDM_TrustPoint11
crl configure
crypto ca trustpoint ASDM_TrustPoint12
enrollment terminal
subject-name CN=chicagotech
keypair bobvpn.ms-mvps.com
crl configure
crypto ca trustpool policy
crypto isakmp identity address
crypto ikev2 policy 1
encryption aes-256
integrity sha
group 5 2
prf sha
lifetime seconds 86400
crypto ikev2 policy 10
encryption aes-192
integrity sha
group 5 2
prf sha
lifetime seconds 86400
crypto ikev2 policy 20
encryption aes
integrity sha
group 5 2
prf sha
lifetime seconds 86400
crypto ikev2 policy 30
encryption 3des
integrity sha
group 5 2
prf sha
lifetime seconds 86400
crypto ikev2 policy 40
encryption des
integrity sha
group 5 2
prf sha
lifetime seconds 86400
crypto ikev2 enable outside
crypto ikev1 enable outside
crypto ikev1 policy 1
authentication pre-share
encryption 3des
hash sha
group 2
lifetime 86400
crypto ikev1 policy 20
authentication pre-share
encryption aes
hash sha
group 1
lifetime 86400
crypto ikev1 policy 25
authentication pre-share
encryption aes
hash sha
group 2
lifetime 86400
crypto ikev1 policy 30
authentication pre-share
encryption 3des
hash md5
group 2
lifetime 86400
crypto ikev1 policy 65010
authentication pre-share
encryption aes-256
hash sha
group 2
lifetime 2147483647

How to decrypt Rapid Ransomware files

Workaround 1: Use file recovery software

It’s important to know that the .rapid ransomware creates copies of your files and encrypts them. In the meanwhile, the original files get deleted. There are applications out there that can restore the removed data. You can utilize tools like Data Recovery Pro for this purpose. The newest version of the ransomware under consideration tends to apply secure deletion with several overwrites, but in any case this method is worth a try.

Workaround 2: Make use of backups

First and foremost, this is a great way of recovering your files. It’s only applicable, though, if you have been backing up the information stored on your machine. If so, do not fail to benefit from your forethought.

Workaround 3: Use Shadow Volume Copies

In case you didn’t know, the operating system creates so-called Shadow Volume Copies of every file as long as System Restore is activated on the computer. As restore points are created at specified intervals, snapshots of files as they appear at that moment are generated as well. Be advised this method does not ensure the recovery of the latest versions of your files. It’s certainly worth a shot though. This workflow is doable in two ways: manually and through the use of an automatic solution. Let’s first take a look at the manual process.
Use the Previous Versions feature
The Windows OS provides a built-in option of recovering previous versions of files. It can also be applied to folders. Just right-click on a file or folder, select Properties and hit the tab named Previous Versions. Within the versions area, you will see the list of backed up copies of the file / folder, with the respective time and date indication. Select the latest entry and click Copy if you wish to restore the object to a new location that you can specify. If you click the Restore button, the item will be restored to its original location.
Previous Versions

Apply Shadow Explorer tool
This workflow allows restoring previous versions of files and folders in an automatic mode rather than by hand. To do this, download and install the Shadow Explorer application. After you run it, select the drive name and the date that the file versions were created. Right-click on the folder or file of interest and select the Export option. Then simply specify the location to which the data should be restored.

How to stop Windows backup

Situation: the client runs Windows Backup on their Windows 2012 R2 server. It stays on 75% completed and their SQL server has a problem.

Resolution: Stop the windows backup by run this command: wbadmin stop job
This is the result:
Microsoft Windows [Version 6.1.7601]
Copyright (c) 2009 Microsoft Corporation. All rights reserved.

C:\Users\Administrator>wbadmin stop job
wbadmin 1.0 – Backup command-line tool
(C) Copyright 2004 Microsoft Corp.

Are you sure you want to stop the current operation?
[Y] Yes [N] No y

The backup operation ended before completing.

C:\Users\Administrator>